Tuesday, December 8, 2015
The iD editor is the browser-based OpenStreetMap editor. iD
is fast and easy to use, and allows mapping from various data sources
such as satellite and aerial imageries, GPS, Field Papers or Mapillary.
The iD editor is a great way to edit for small and easy changes that
don’t require the advanced features of JOSM (a more advanced mapping
editor). This chapter demonstrates the basics of editing with iD.
Starting the iD Editor
- The iD editor requires an active connection to the Internet.
- Open your Internet browser, and go to the OpenStreetMap website at http://www.openstreetmap.org.
- Login using your OpenStreetMap account
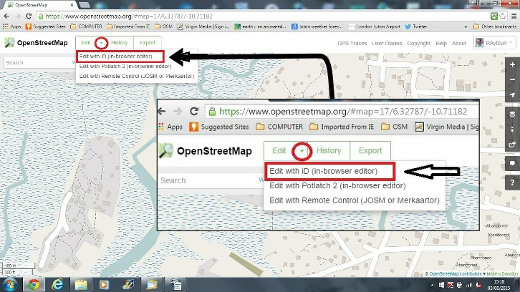
- Pan and zoom the map to the area that you wish to edit. You can pan by holding the left mouse button and dragging the map to your desired area.
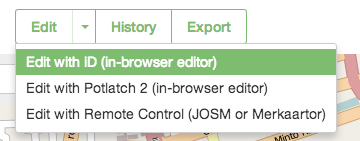
- Click on the small arrow next to Edit. Then click Edit with iD (in-browser editor).
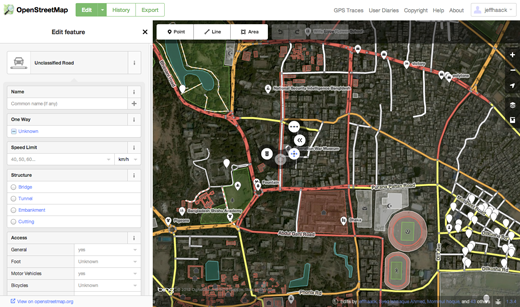
iD Editor User Interface
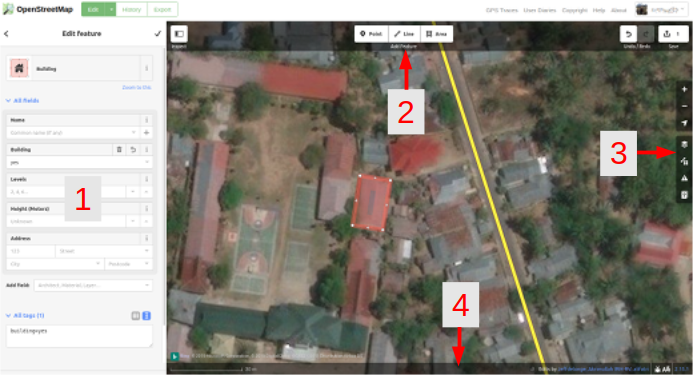
- Edit Feature Panel: This panel shows tags from the object selected on the map. You can add or edit tags from this panel.
- Tools: This panel shows basic editing tools:
- Draw point (node), shortcut key 1

- Draw line (way), shortcut key 2

- Draw shape (polygon), shortcut key 3

- Undo, shortcut keys Ctrl+z

- Redo, shortcut keys Ctrl+y

- Save changes, shortcut keys Ctrl+s

- Map panel: This panel show various configuration functions:
- Zoom In, shortcut key +

- Zoom Out, shortcut key -

- Go to your location

- Configure background layer, shortcut key b

- Map Data, shortcut key f

- Open Help Menu, shortcut key h

- Information panel: This panel shows various information, such as the scale bar and which users have contributed to the area.
Configuring the Background Layer
Before you start editing, you can change the background layer.
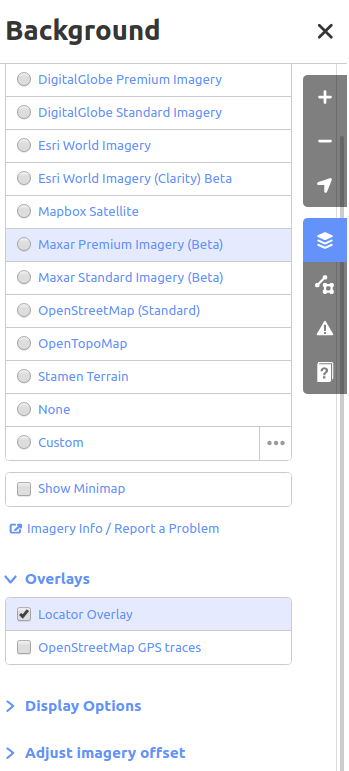
- Click the Background settings button or use the shortcut key b.

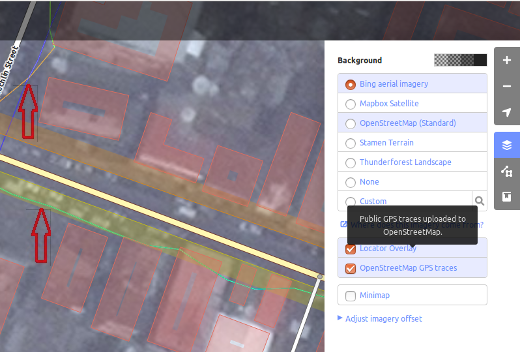
- You will see a panel like this:
- You can change the brightness level by clicking one of these boxes:

- There are 4 different brightness levels - 100%, 75%, 50%, and 25%. Click on each of them to see the difference.
- You also can change the background layer based on your desired tile provider (the default is Bing Aerial Imagery). Try the various options available from this list.
- You can add your own map tiles by clicking on Custom.
- For example, if you want to add a Field Paper, click Custom then click on the magnifying glass (search) icon to open the following window:-
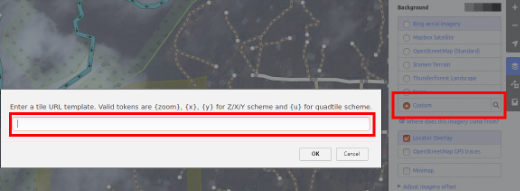
and enter your FieldPaper snapshot URL, which will be something like this: http://fieldpapers.org/snapshot.php?id=cqhmf2v9#18/37.80593/-122.22715
- You can display GPS tracks from your computer (GPX format). It is as easy as dragging and dropping the GPX file into iD editor.
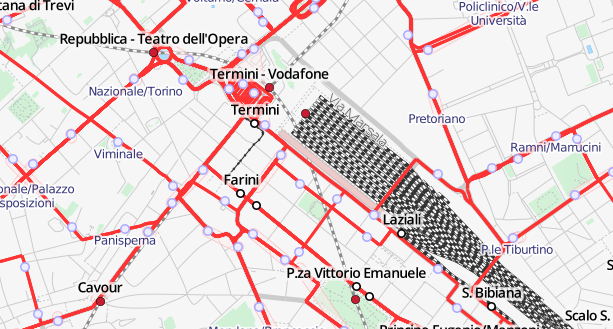
- You can enable OpenStreetMap GPS traces to display public GPS traces available for the area. In the image below, public GPS traces are shown in various colors, indicating the direction of travel.
- If there is imagery offset, you can correct the imagery offset by clicking Fix Alignment.
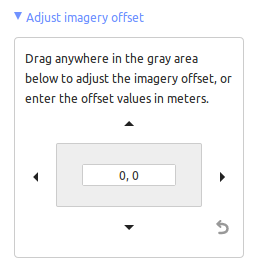
- Click the navigation buttons to move the imagery. Click the reset button to return to the default position.

Basic Editing with iD
Now let’s start practicing with iD.
Adding Points
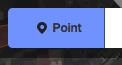
- To add a new point, click on the Point button.
- Your mouse cursor will change into plus (+) sign. Now, click on a position that you know to mark a location. For example, if you know that there is a hospital in your area, click on the position of the hospital building.
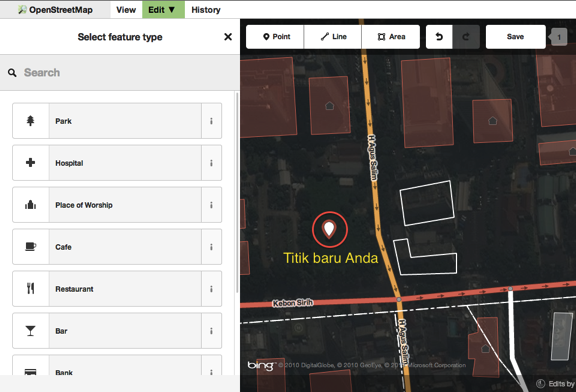
- Notice that a new point is added. At the same time, the left panel will change to show a form where you can select attributes for the object. Click Hospital to tag the point as a hospital.
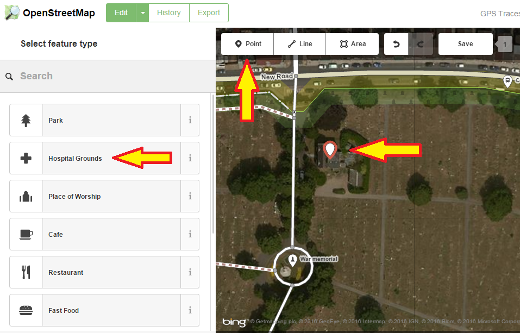
- You can use the forms to fill detail information about your point. You can fill hospital name, address, and/or other additional information. Note that each feature will have different options, depending on what tag you choose from the feature panel.
- If you make a mistake, such as a wrong location, you can move your point to a new location by holding the left mouse button on your point and dragging it. Or, if you want to delete your point, click the left mouse button on the point and then click the button which looks like a trashcan.

A “point” created in the iD editor is actually a standalone “node” with a set of “tags” on it.
Drawing Lines
- To add a new line, click on the Line button.
- Your mouse cursor will change into plus (+) sign. Find a road that hasn’t been drawn on the map and trace it. Click once on a point where the road segment begins, move your mouse, and click to add additional points. Double-click to end the drawing process. Notice the panel on the left.
- Just as with a point, select the appropriate tags for your line.
- You can drag points from the line by clicking your left mouse button on a point and dragging it.
- You also can move the whole line by selecting it, and choosing the Move tool. Then drag the line to a new position.

- When you click your left mouse button on an individual point (node) on the line, you will see these tools:
- Delete point from line
- Disconnect point from line

- Split a line into two lines from the point you’ve selected

- Delete point from line
- When you click your left mouse button on a line (but not on a point), you will see these tools:
- Delete line
- Create a circle from a line (only active if the line is closed)

- Move line
- Form a square shape from a line (only active if the line is closed)

- Reverse line direction (good for rivers & one-way streets)

- Delete line
A “line” created in the iD editor is actually a “way” with “tags” on it.
A special note about Deleting: In general you should avoid deleting other people’s mapping if it just needs improvement. You can delete your own mistakes, but you should try to adjust other people’s mapped objects if they need changes. This preserves the history of the items in the OSM database and is respectful of fellow mappers. If you really feel something should be deleted, consider asking the original mapper or one of the OSM email lists about it first.
Drawing Shapes (Polygons)
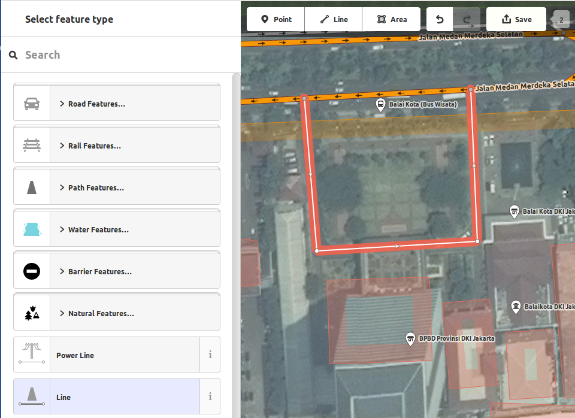
- To add a new multi-sided shape, click on the Area button.

- Your mouse cursor will change into plus (+) sign. Try to trace a building using the imagery as a guide.
- You will notice that the color of your shape will change depending on the attributes that you assign to it.
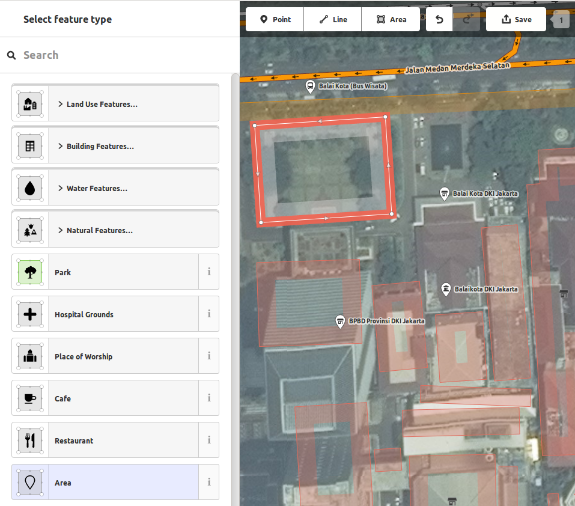
- The tools that are available when you select a shape are similar to those when you click on a line.
A “polygon” in the iD editor is actually a “closed way” with tags on it.
Saving Your Changes
- When (and if) you want to save your edits to OpenStreetMap, click the Save button. The panel on the left will show the upload panel.
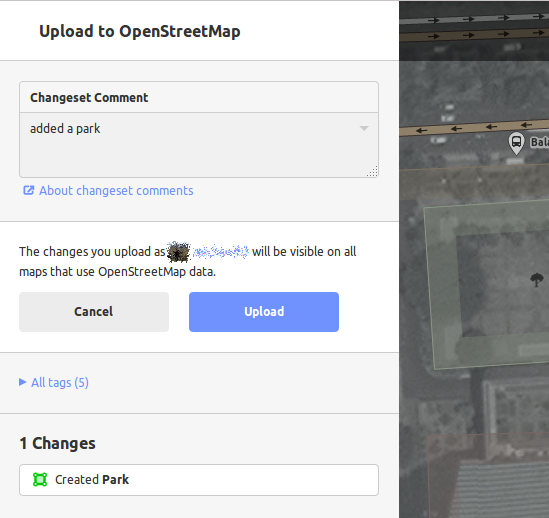
- Enter a comment about your edits and click Save.
Additional Information and Custom Tags
- When you are editing an object, you will see a strip of icons at
the bottom of the attribute panel. You can add additional information by
clicking these icons:
- Add elevation

- Add notes

- Add contacts / phone number

- Add source tag

- Add website

- Add accessibility information

- Add Wikipedia link

- Add elevation
- Or, you can add custom tags by clicking All tags.

- This will show all the tags attached to the feature.
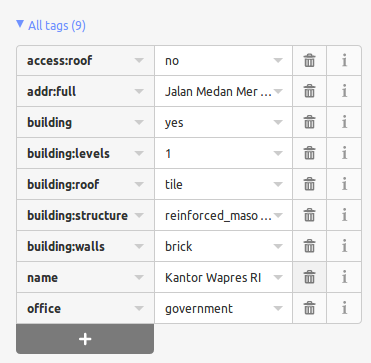
- Click the plus sign (+) to add keys and values or click the trash icon to delete tags.
iD is good for…
- When you are doing simple edits
- When you have fast Internet to load the imagery and save the edits
- When you want to be sure to follow a consistent and simple tagging scheme
- When you are restricted from installing a program on the computer you are using
Courtesy- learnOSM.org
In this section we will learn step by step how to navigate the
OpenStreetMap website, view maps, and sign up for a user
account. After you have your own username and password, you will be able
to contribute your first points to the map.

Visit the OpenStreetMap Website
- Before you begin, be sure your computer is connected to the internet. (If you are reading this online, then you must be connected!)
- Open your web browser. Common browsers are Firefox, Chrome, Opera, or Internet Explorer. If it is already open then you can create a new tab.
- In the address bar at the top of the window, enter the following and press Enter: www.openstreetmap.org
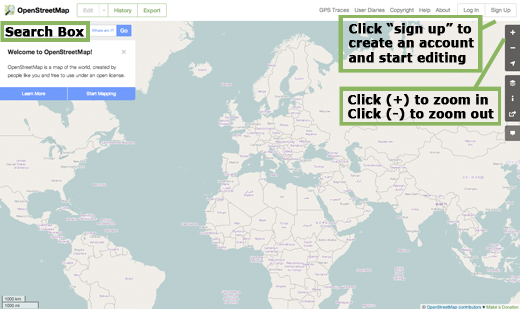
- When the page has finished loading, you should see something like
this:
Navigate the Map
- The main thing you should see is the map. Move the map by clicking
on it with your left mouse button, holding the button down, and
dragging your mouse around (see figure below).
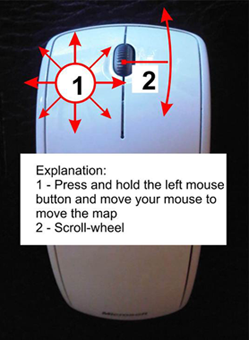
- If you have a mouse with a scroll-wheel, zoom in and out on the map by turning the wheel. If you don’t have a scroll-wheel, use the + and – buttons on the upper right corner of the map. (see figure below)
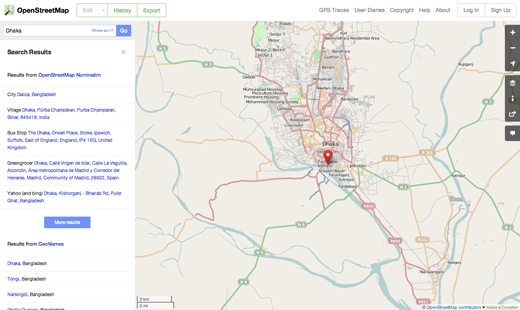
- To search for a place, left-click in the box labelled “Search” on
the left side of the page (see figure above). Type in the name of
your town or village and press Enter. A window should appear to the
left of the map with the results of your search. Click on the
location that looks like the one you want. The map will
automatically move to the location you chose.
View Different Map Styles
OpenStreetMap contains geographic data from all over the world. Although
it is a single database, the data can be interpreted and styled in
different ways. To see this in action, let’s look at various map “styles”
available on the OSM website.
- Click on the Layers button on the right side of the map window.
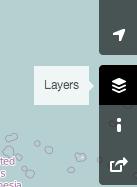
- Click on the different style options for the map. Notice how the map
changes with each one. The transport map, for example, emphasizes
transportation routes on the map while the cycle map emphasizes cycling
routes. All of the data to make this possible is contained in the OSM
database.
Create an OpenStreetMap Account
- Now that you have seen what the main website looks like, you can register for a username and password and make your first additions to the map.
- On the OpenStreetMap website, click “sign up” in the top right corner of the page.
- You should see a new page that looks like this:
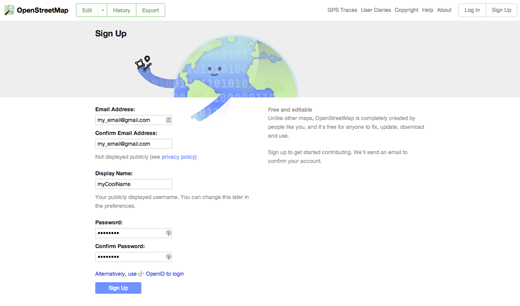
- There are five boxes on this page that you need to fill in to register an account with OSM.
- Enter your email address in the first two boxes. You should enter the same email address in both boxes. Later, you will need to open your email to confirm your account with OpenStreetMap.
- In the third box, enter the username that you would like to have. You will not be able to choose a username that someone else has chosen before, so it should be creative. If you try to enter something simple, like your first name, it is likely that someone has already claimed that name.
- Enter a new password in the fourth and fifth boxes. You should enter the same password in both boxes. It does not need to be the same as the password for your email.
- You may want to write down your OSM username and password. You will need it to log in later.
- After you have completed all the boxes, click “Sign Up” at the bottom of the page.
- If there are any problems, an error message may pop up. Check to make sure that your email is the same in the first two boxes, and your password is the same in the bottom two boxes. If the third box is highlighted red, it means that someone else has already chosen your username, and you should try a different name.
- Open a separate window or tab in your internet browser, and navigate to your email. Common email sites are mail.yahoo.com and www.gmail.com.
- Enter your email address and your email password to open your email. Note that this is not the same as your OpenStreetMap username and password.
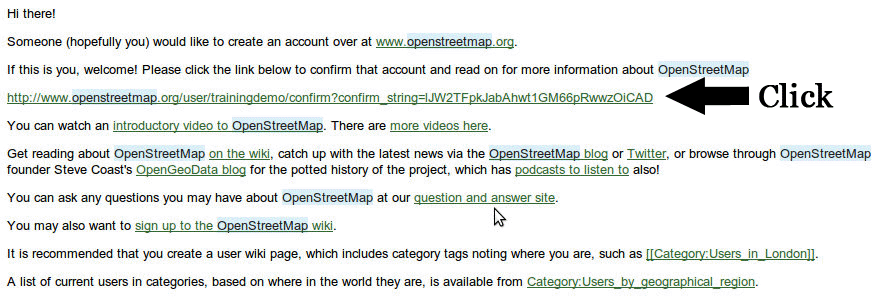
- If everything was successful with your registration, you should see
an email from OpenStreetMap in your inbox. Open the email. It should
look like the image below. Click on the link that is identified
below:
- A new tab or window will open. If everything went well, you should have an OSM account!
- On the OpenStreetMap page, click “log in” in the top right corner. Enter your OpenStreetMap username and password and press Enter. You should now be logged in. You should see your username in the upper right corner of the page.
Adding Your First Points
- Now that you are logged in with your username on the OpenStreetMap website, you can use the iD editor to add your first point to the map.
- Move the map to a place that you know very well, such as your town or neighborhood. A good idea is to ensure your home (or your neighbour’s home) and workplace are drawn and given the correct address.
- Zoom in to a place where you would like to add a point to the map (perhaps a restaurant or grocery store near you isn’t yet mapped).
- Just above the map on the left, there is a tab named “Edit” with a small triangle besides it. Click the small triangle. You should see a menu drop down.
- Click “Edit with iD (in-browser editor)”.
- The online editor, named iD, should open. It will look something like this.
- You can add a point to the map by clicking on the button named “Point” at
the top the window. Then click on the map where you would like to add a new
point.
- Select from the menu on the left what type of location it is that you are adding to the map. You can then fill in the appropriate form with the location’s name and other information.
- To save your changes, click the “Save” button at the top. Since this is your
first edit, you may prefer to play around with the editor. Don’t save your changes
unless you are sure they are correct.
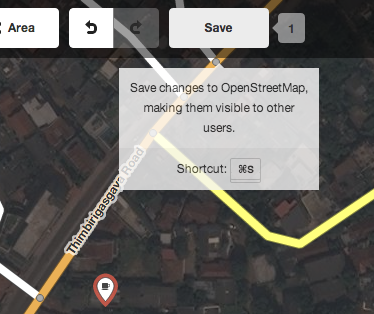
- If you do click Save, you will be asked to provide a description of your changes. Then you can click “Save” once more, and your additions will be saved to the OSM database!
The iD editor is a fantastic way to easily edit OpenStreetMap, and you can find out more about using it in the iD editor guide. However, in the JOSM section
we will be looking at JOSM, a standalone application that offers many more features. Feel free
to continue playing with iD. Once you have more experience contributing to OSM, you can choose
which editor you like using the best.
Congratulations!
If all went well you now have an OpenStreetMap username
and password, you know how to navigate the OSM website, and you have
your first understanding of how to add points to the map.
Courtesy- LearnOSM.org
Subscribe to:
Posts (Atom)